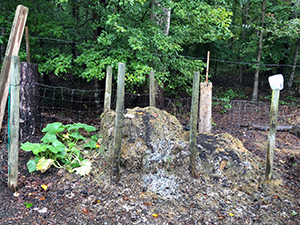
Building a 3-section compost bin allows for decomposition in various stages.
Wait – don’t toss out those food-prep vegetable and fruit scraps. They could be next spring’s shot-in-the-arm for your garden.
Combined with shredded leaves, grass clippings and shredded paper, you’ve got the makings for compost. Recycling garden waste and certain kitchen scraps can yield a precious prize – some of the richest, most fertile and best soil for planting, top dressing and amending your garden.
Composting takes commitment, but it’s well worth the work. Materials should be added regularly; the pile must be stirred, shoveled or turned frequently; but the results are better than just about anything you can purchase in a garden center.
Some experts call the dark composted earth “Black Gold,” because it’s a precious commodity that produces large healthy plants with vigorous root systems and plenty of lush foliage. Roots need oxygen to grow, and adding compost gives a better consistency to our compacted Georgia clay.
It’s better than using a commercial product like Clay Buster or Nature’s Helper alone, though it is much harder to come by and takes months to “cook,” the term used by experts to describe the decomposition process.
Compost adds richness to the soil, replaces nutrients, helps plant roots and provides good bacteria for all kinds of plants. It gives the soil ‘tilth’ so that plants’ roots have room to breathe.
How to start
Without getting too technical, composting is the natural process of breaking down piles of certain materials through proper aeration, moisture, particle size and nutrient levels (nitrogen) that keep the process moving.
You can use containers, available from garden stores and box retailers, designed especially for composting. Online sites, such as Breck’s, Burpee, Spring Hill and others also sell big drums on legs that can be turned by using a crank.
You can also create your own container, using chicken wire or by wiring wooden pallets together to form a three-sided box.
We use three large bins created by posts and fence wire, enclosed on three sides, and it works well. This season, we even had some compost left over from our vegetable gardening.
Ingredients matter
Once you’ve got your area selected, start gathering ingredients. A combination of brown and green provides a good base – brown leaves, green grass clippings, chipped pruned branches from your fall clean-up – augmented by kitchen scraps (no meat products), a bit of fertilizer and even horse or chicken manure.
Put the coarser materials on the bottom. They will decompose faster and allow air circulation throughout the pile. Moisten each layer as it’s added, moist, but not soggy. Add a one-inch layer of soil or completed compost to assure that the pile will have a head start with decomposing microbes. A good dose of nitrogen – from either fertilizer or livestock manure – goes on top.
Layer the ingredients and allow them to rest for a couple of weeks. Then use a large open-tined pitchfork to turn the pile, mixing it thoroughly.
The process relies on heat generated by the decomposition process. A productive compost system needs regular turning, about every week to 10 days, as well as regular watering if fall and winter rains are sparse.
Spring has its rewards
If you’ve been minding your compost, adding more kitchen scraps and brown materials, plus regularly turning the pile, you’ll have a natural planting booster by late winter, when you’re ready to prep your vegetable beds.
You can also use the mature compost as a top dressing for plants, spreading it on the surface of the ground beneath shrubs, trees and even annuals. If you have a big supply, use it as a soil amendment for planting annuals, perennials, shrubs and trees.
Give composting a try this winter. It’s an excellent way to recycle kitchen waste and the regular turning is a good excuse to get outside for a little exercise. You certainly won’t get cold turning your compost pile when the temperatures are in the 40s.


